Soboro Donburi

image

Upon my return to Tokyo I decided it was time to indulge my inner-otaku (or geek). Having spent so much time luxuriating in the rich history of Japan I decided to spend some time focusing on the nerdier aspects of life in the Japanese capital. My first stop was Akihabara, a hub for all things technological, collectible and animated. Here, being a geek is acceptably mainstream. The area is immensley colourful and hums with the sounds of arcades and pachinko machines. On a sunday, the street is closed to traffic in the afternoon and the local cosplayers come out of the woodwork to show-off their latest intricate outfits. I had a ton of fun hanging out in Akihabara, but in reality my biggest geeky obsession is food.

So the very next day, I went to Tsukiji fish market. I wasnt quite enthusiastic enough to make it there by 4am for the legendary Tuna auction, but I did make it there early enough to enjoy my own sushi breakfast. From there I returned to Chuo to attend a fantastic cookery class with some fellow gaijin.

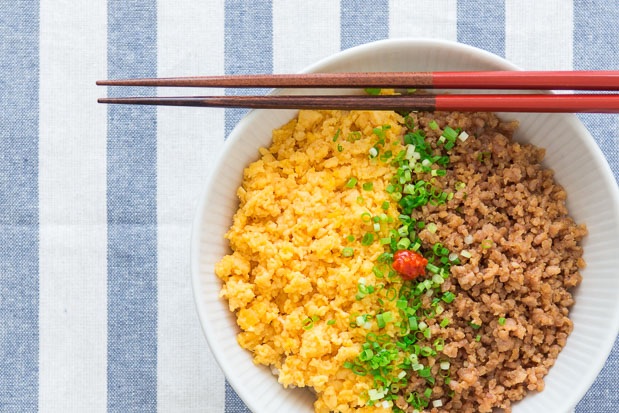
My favourite recipe was for Soboro Donburi, a simple Washoku (or home-style) dish comprising of very few ingredients – all of them cheap, nutritious, filling and deeply savoury. I have included the recipe below.


Level: low
Methods: frying, boiling

Time: 20 minutes
Makes: serves 2


Ingredients

100g rice
250ml water
200g minced chicken
2tbsp sake
1 1/2tbsp soy sauce
1tbsp sugar
2 eggs
1tsp sugar
1/2tsp MSG (optional)

Chives, cucumber or spring onion for garnish (finely sliced)


Method

1. Place the rice and water in a small saucepan. Stir once.

2. Cover with a tightly fitting lid and bring to the boil.

3. Boil for 8-10 minutes, then remove from the heat and allow to steam with the lid still attached.

4. Meanwhile mix together the sake, soy sauce and sugar.

5. Begin to sauté the chicken mince in a frying pan over a medium heat. Then pour in the sauce ingredients and cook until the liquids have evaporated and been absorbed into the meat.

6. Place in a bowl and sert aside.

7. Using the same pan, add the eggs, sugar and MSG. Whisk together briefly and cook, stirring occassionally, until scrambled.

8. To serve the donburi, place some rice into the bottom of a high sided bowl. Cover half with the chicken and half with the scrambled egg. Use your green vegetable garnish to create a line through the middle of the bowl.

Japanese-style Soft Bread Rolls

image

I departed south early one morning on the famous bullett train, headed for Kyoto. Steeped in history, the city itself was the Japanese capital for over a thousand years.

On my first full day I ventured out to explore the city and bumped into a befuddled looking English couple at the train station. Together we were able to work out how to get to the Fushimi Inari shrine, a vast meandering path up the side of a hill, annointed with hundreds of red gates, designed to honour the Shinto god of rice. As we had similar itineraries, my new friends and I also visited the Golden Pavillion and Nijo Castle together. On our way back to the city we settled on a cheap lunch at a small bakery. The food inside was a revelation. Almost every item was small, decorative and comprised of a ridiculously light, tender crumbed milk bread. The bread, which was shaped into any conceivable shape was baked with a filling inside, rather than being filled after baking like a sandwich. Fillings included: hot dogs, ham, cheese, chicken, curried vegetables, red bean paste, apples and luscious creme patisserie.

The tiny flavour packed morsels were a treat I returned to many times during my continued stay in Japan, but what I was really interested in was the super soft bread. I spoke to some fellow travellers, consulted the internet and spoke to a teacher at a cookery school and came to the conclusion that the dough was enriched with both milk and egg, as well as a water roux known as a tangzhong. The science behind this new baking technique, popularised in east asia, is a little murky – but essentially the water roux inhibits some gluten development resulting in a softer, less chewy crumb. However it still allows the same amount of water to be included in the recipe and this, in combination with the additional hygroscopic butter and milk, mean the bread stays fresh for longer. The method isn’t the easiest, and the proving of the dough is even more important than with a standard loaf, so be sure to follow the recipe precisely.


Level: high
Methods: baking
Skills: water roux, enriched bread dough

Time: 4 hours minimum (including proving time)
Makes: 16 buns


Ingredients

325g bread flour
150g plain flour
20g milk powder
50g caster sugar
1tsp salt
1 7g sachet fast action yeast
2 eggs, lightly beaten
100ml lukewarm water (approx.)
75g butter, cubed

For the Water-Roux Paste:
25g bread flour
125ml water


Method

1. For the water roux, mix 25g bread flour and 125ml water in a small saucepan.

2. Cook over a medium low heat, stirring continuously until it reaches 65ºC. If you do not have a food probe the paste should be a semi-solid gel with a dropping consistency.

3. Remove from heat, cover with cling film to prevent a skin forming and allow to cool.

4. When ready to continue, sift the bread flour, plain flour, milk powder, caster sugar and salt into a large mixing bowl. Add the yeast and mix well.

5. Add the lightly beaten eggs and lukewarm water roux. Stir with a table knife.

6. Gradually add just enough hand-hot water to form into a slightly sticky, soft dough.

7. Turn out onto a lightly floured work surface and knead for 10 minutes until smooth and elastic.

8. Knead in the butter until incorporated. Form the dough into a ball.

9. Lightly grease the mixing bowl and place the dough back inside to prove. Ther dough should double in size. This can take 1-2 hours.

10. After the first rise, knock back the dough and knead briefly once more.

11. Divide the dough into 16 equal portions and shape into buns.

12. Place the finished buns on a greased baking tray and lightly cover with cling film. Allow to rise for 1 hour more.

Tip – In order to produce a tender crumb the second prove is vital. Sometimes I like to place a bowl of water in the microwave and heat for about thirty seconds. I then turn off the microwave, and place the buns inside. The hot, steamy atmosphere helps the bread rise.

13. Preheat the oven to 190ºC.

14. Glaze the buns with some milk or water. Bake for about 12 to 15 minutes, or until golden brown.

Negima Yakitori

image

It has long been a dream of mine to go to Japan. In fact when planning this trip, Japan was one of only five “must-visit” countries on my list. Something about the country takes me back to my childhood, when I used to watch documentaries about miraculous robots, seemingly-impossible gadgetry and toilets with myriad bum-cleaning settings. Ostensibly, to my young eyes, it looked like a glimpse into the future. Sadly, times have changed and as technology companies have upped the stakes, that seemingly-impossible gadgetry I once saw on Blue Peter and the like, looks pretty mundane by comparison. 10 year old me would be more dazzled by the now ubiquitous iPhone than by a toilet with a built in bidet and heated seat. But there is still much to marvel at in Tokyo and nowadays I find myself more drawn to the ancient rituals, shrines and dazzling architecture.

To my suprise I was most struck, not by all the things that make Japan so different from the UK, but instead the overwhelming parallels. Depite the obvious geographical similarities (we’re both island nations etc.), I was amazed by how similar we are culturally. A country steeped in heritage and history, sitting merrily beside modern convenience. The importance of manners. How their seemingly controlled exteriors bely a wicked sense of humour and a prediliction for dirty jokes. They drive on the left hand side of the road. They queue. For everything. And they do so with grace and patience. Did you know most North Americans I’ve met don’t even know what the word queue means?

But one key difference was the food. To western palettes some of the things I tasted could be challenging. Even simple confections are turned on their head, with wasabi flavoured jellies, red bean flavoured kitkats and fish-shaped waffles (known as Taiyaki) filled with purple sweet potato among them. I did however seek out the more recognisable aspects of Japanese cuisine. In Shinjuku I visited a decades old restaurant that specialises in the art of tempura making. The chefs work in an open kitchen opposite a diner-like bench of seating. The tempura itself: feather light, with a melt-in-the-mouth quality that I have yet failed to reproduce. But in the district of Asakusa, I tasted one of the ultimate street foods – Yakitori. Nothing is more gloriously simple or simply portable than meat on a stick.

The term Yakitori sometimes gets misused here on restaurant menus. Yakitori is comprised of two characters, Yaki (焼き) meaning to grill and Tori (鳥) meaning chicken. Simple in concept but difficult to master, this style of cooking is extremely economical as it uses all the parts of the chicken, from typical cuts like breast and thigh, to more adventurous options like liver and heart. The cuts of meat are prepared, marinated and grilled on skewers over hardwood charcoal. When other foods are used, like beef, pork, fish or seafood, they are called Kushiyaki (串焼き) meaning “grilled skewers”. The marinade for Yakitori is often extremely simple, utilising fundamental Japanese condiments. Here I have used the marinade to create a glaze for basting, which is infused with some aromatics.


Level: low
Methods: marinating, grilling

Time: 30 minutes (+ 2 hours marinating time minimum)
Makes: 12 skewers


Ingredients
460g skinless, boneless chicken thighs
6tbsp soy sauce
4tbsp sake
4tbsp mirin
1tbsp caster sugar
6-8 spring onions, root and loose leaves removed
2 garlic cloves, peeled and crushed with the heel of your hand
1tsp black peppercorns

12 bamboo skewers soaked in water


Method

1. Open out the chicken thigh fillets and cut into small cubes (around 1-inch/2cm). Place in a bowl.

2. Combine the soy sauce, sake and mirin in a jug. Pour the sauce over the chicken and allow to marinate for a few hours.

3. When ready, chop the spring onions into quarters.

4. Thread the skewers alternatively with pieces of chicken thigh and the spring onion.

5. Pour the remaining marinade into a small pan. Add the remaining spring onions, the sugar, garlic cloves and peppercorns. Bring to a boil and allow to reduce by half to make a shiny glaze.

6. Preheat the grill to medium and place the skewers under the heat for 5-6 minutes, turning frequently. Baste with the reduced glaze after each turn.

7. When the glaze has started to burnish and the chicken is cooked through, remove from the grill and serve.

Tahitian Prawn Curry

image

The time I spent in Tahiti and Moorea, was enchanting. Its easy to see why this is such a popular Honeymoon destination. The beaches are beautiful, with crystal clear inviting water. The history is equally enthralling and the tiki statues dotted around the island lend a magical touch. Most important though is the lush vegetation. The peaked centres of each island (formed from underwater volcanic eruptions) are covered with beautiful swathes of verdant flora. And it is these trees, both indigenous and otherwise, the form the basis for Polynesian cuisine.

On a tour of the island I discovered that owning landis regarded as one of the most important things to Polynesian families, with plots being handed down from generation to generation. On each families plot you can find a combination of the five trees that bear the staple foods for their diet – breadfruit, banana, coconut, lime and papaya. Protein comes in the form of freshly caught seafood and organically reared chicken. The roots of this diet (which is surpringly high in fat and carbs) come from a time when locals were hunters, gatherers and fishers, and could easily burn off their consumed calories through their activities. However my guide informed me that modern islanders tend to buy their meat from a supermarket nowadays and have adopted a westernised sedentary lifestyle. Along with a distinctly relaxed attitude to life in general, this has meant that obesity is on the rise. Even in some of the most isolated places on earth, globalisation and commerciaism are having an impact.

Regardless of its calorific content, traditional Polynesian food is quite delicious. Poisson Cru, the national dish, is similar to south american cerviche but is augmented with coconut milk and served with local fruits. French influences are also understandably strong and I sampled a fresh seafood carppacio and white fish cooked en papillote (with banana leaves standing in for the usual baking parchment.) My favourite dish however, was an especially interesting fusion of flavours which I sampled at one of the many Rolloutes or food vans, dotted around Papeete: a Tahitian Chevrette Curry. Thats prawns to me and you. The dish is made using traditional south asian curry spices, but is made uniquely polynesian with the addition of coconut, lime, papaya and the delicate scent of Tahitian vanilla seeds. The idea of fruit and vanilla in a curry may sound challenging, especially when paired with seafood, but it really is quite delicious. Besides, there is only one way to find out…


Level: medium
Methods: tempering spices

Time: 1 hour 15 minutes
Makes: feeds 4


Ingredients
2tbsp vegetable oil
3 small sweet potatoes, peeled
1 onion
2 cloves garlic, peeled
1 mild red chilli, halved and deseeded
1 inch ginger, peeled
1tsp coriander
1tsp paprika
1/2tsp turmeric
1/2tsp cumin
1/2tsp fenugreek
1 cinnamon stick, broken
2 cloves
200 ml coconut milk
1 tsp vanilla seeds
500g prawns (frozen is fine)
1 pinches black pepper
3 papaya, peeled and cubed
juice of 1 lime


Method

1. Chop the sweet potato into large chunks, and boil in a large saucepan of boiling salted water for around 10 minutes or until tender. Drain.

2. Place the onion, garlic, chilli and ginger in a small food processor and blitz to make a paste.

3. Heat the oil in a clean wok and gently fry the dry spices for 30 seconds or until they release their aroma. Then add the onion paste and fry for a further 3-4 minutes.

4. When softened, add the coconut milk and bring to a simmer. Do not boil.

5. Stir in the vanilla seeds and prawns. Simmer together for 4-5 minutes and season.

6. Add the cooked sweet potato and cook for a further few minutes.

7. Stir in the papaya and lime juice. Remove the clove and cinnamon.

8. Garnish with spring onion or chopped coriander and serve with plain boiled rice.

Hokey Pokey Ice Cream

image

If the north island had been about adrenaline-fuelled adventure, the south island was an entirely more relaxing affair. Whilst there, I bonded with my new friends on the crystal-clear coastline of Kaiteriteri, dressed up and danced the night away at the affectionately named Poo Pub in Mahinapua, scaled a glacier in Franz Josef, drank my body-weight in alcohol in Queenstown and wondered at the innovative town centre of Christchurch where packing containers double as shops, during the slow recovery from the devastating 2011 earthquake. And for anyone who has been to Queenstown, yes, I did try a Fergburger and frankly it was delicious. By the time I hit Kaikoura I had said goodbye to the majority of my friends as I made an accelerated rush back to Auckland for my next flight. After almost a month with my new friends, it was a difficult experience parting, but one I am destined to repeat during my ongoing travels.

The weather in the south island was marginally better than the north during our stay, and there were a mixture of hot and cold days. On those hot days many of my fellow travellers would indulge in ice cream, to stave off the heat. Although I rarely did the same, the budget situation being what it was, I did taste what I believe to be the most kiwi of all the ice cream flavours – Hokey Pokey. Hokey Pokey is, as any readers from south west England will know, another name for honeycomb. This shimmering, supersweet confection is held in high regard in NZ and can be purchased at many a souvenir outlet. The idea of combining it with rich, creamy vanilla ice cream seemed too decadent to comprehend, yet somehow the two counterbalanced eachother, providing a marvellous summer snack. The Hokey Pokey, lost some of its tooth-shattering hardness, yielding slightly in its new vanilla scented home. The overt sweetness also helped to somehow alleviate the cloying richness of the ice cream. Quite a treat indeed.

I have decided to share with you my recipe for no-churn ice cream, as well as homemade hokey pokey. I think the recipe for the ice cream originally came from the UK Good Food magazine, so I give them credit here. The ice cream is a breeze to make, but is a tad sweeter than most and must be consumed within a few days – consider that a challenge if you must! If you don’t fancy giving this time saver a try, then feel free to make your own favourite recipe, or even buy a good vanilla ice cream from the shops. The hokey pokey can be added half way through the freezing process as I have done here, or crumbled generously over the ice cream before serving.


Level: easy
Methods: whisking, caramel production

Time: 5 hours minimum (including freezing)
Makes: feeds 8-10


Ingredients

For the ice cream:
1/2 397g can condensed milk
600ml pot double cream
1tsp vanilla extract

For the Hokey Pokey:
100g caster sugar
4tbsp golden syrup
1 1/2tsp bicarbonate of soda


Method

1. Put the cream into a large bowl and whisk for a minute until it has begun to thicken.

2. Add the condensed milk and vanilla, then continue whisking until stiff peaks have formed. Do not over whisk however or the mixture will seperate and become greasy.

3. Scrape the mixture into a loaf tin or plastic tub, cover with cling film and freeze until solid (about 4-5 hours.)

4. Meanwhile, to make the Hokey Pokey, put the sugar and syrup into a saucepan and stir together.

5. Place the pan over a medium heat and allow to melt. Do not stir at this point!

6. When the mixture is bubbling and has the coppery colour of maple syrup, remove from the heat. This should only take 3-4 minutes.

7. Immediately whisk in the bicarbonate of soda and watch as the syrup erupts into an aerated golden cloud. Caution the mixture is still inordinately hot, so handle with care.

8. Turn the mixture onto a piece of good quality baking parchment or heavily greased foil. Allow to harden and cool.

9. Once set, bash the honeycomb until it shatters into glistening shards no bigger than a 10 pence piece.

10. Remove the ice cream from the freezer and delicately fold in as much (or little) of the Hokey Pokey as you wish. Replace until solid.

11. The ice cream is fairly soft for the first few days, but it is still preferable to remove from the freezer for 15 minutes before consumption to allow it to soften further.