Plokkfiskur Pasties (Icelandic mashed haddock and potato)

image

On the same day I attempted to eat shark, I also tasted a dish named Plokkfiskur. Now, the English translation of Plokkfiskur is simply mashed fish, but I found that description more than a little off-putting, considering how delicious this classic dish is. Plokkfiskur is a true peasants meal and was traditionally used as a way to liven up leftover poached haddock.

The dish itself is composed of few ingredients and has a smooth, almost gummy texture that is reminiscent of the best cheese and onion pasty fillings (think Ginsters!) In fact it is this very notion that gave birth to my anglicised recipe variant, a Plokkfiskur pasty. For those who aren’t keen on this idea, you can instead take a more authentic path and choose to gratinate the mashed mixture with rye-breadcrumbs and grated Gouda.


Ingredients

For the Potato Pastry:
190g cold mashed potato (no butter or milk added)
210g plain flour
100g butter, chilled and cubed
1 tsp baking powder
1/4 tsp salt
cold water

For the Plokkfiskur:
560g haddock (cooked and cooled)
560g potatoes (peeled, diced and boiled)
1 onion (chopped finely)
350ml whole milk
55g butter
3tsp plain flour
salt and pepper
1-2tsp snipped chives


Method

1. First make your pastry. Combine the flour, salt and baking powder in a large bowl.

2. Add the fat and rub in with your fingertips until it resembles coarse breadcrumbs.

3. Mix in the mashed potato until a ball of dough forms that leaves the sides of the bowl clean. It is at this point that you may need to add a little water.

4. Rap the dough in cling film and chill for at least 30 minutes.

5. Meanwhile, skin the cooked haddock fillets (check for bones as you go) and break up the fish into flakes.

6. Finely chop the onion and add to a saucepan with the butter.

7. Warm over a medium heat until the onion starts to soften.

8. When cooked, spoon over the flour and stir to make a roux. Stir well for 1-2 minutes.

9. Gradually add the milk, stirring continuously. Allow to simmer for 3-4 minutes, stirring often.

10. Remove from the heat and add the potato and flaked fish. Stir roughly so that some of the pieces are broken up and others remain whole.

11. Finally add the chives and a generous amount of seasoning, then set aside to cool.

12. Preheat oven to 200°C.

13. Next, remove the pastry from the fridge and roll out on a floured work surface, until approximately 45 by 30cm. I sometimes roll the pastry between two sheets of clingfilm as it can get quite sticky.

14. Cut the pastry into six equal 15×15 squares.

15. One at a time spread a generous portion of Plokkfiskur onto one half of each square. Fold over like a book and seal with a fork and some egg wash. Brush the tops with more egg and prick with a few holes to allow the steam to escape.

16. When completed, transfer your pasties to a baking tray and bake for 20-25 minutes or until golden brown and cooked through.

Hjónabandssaela (Blissful Marriage Cake)

image

This delightful recipe proved to be my first taste of true Icelandic cooking, as I first enjoyed it on my flight from Heathrow.

As I begun to investigate the recipe further I was really struck by the name – Hjónabandssaela, which literally translates as Blissful Marriage Cake. Now my students will know that I am a fan of etymology (the study of the origin of words and the way in which their meanings have changed throughout history.) But interestingly there seems to be no consensus on how this simple bake acquired such a unique name, but there are two realistic theories.

1. The simple, store cupboard ingredients are an ideal “marriage” of flavours.

2. This cake is so easy to make, that even the most domestically challenged housewives can throw this together, in order to satisfy her husband and make their marriage blissful.

What is known however, is that the cake has never been a part of Icelandic wedding ceremonies, so it is up to us to choose the theory we most prefer.

This recipe has a lot in common with the more refined Linzer Torte of Austrian origins. The addition of oats and brown sugar makes this decidedly more rustic and in my opinion, all the more enjoyable for it. All of the ingredients used here are plentiful in Iceland, and for that matter in the UK. Rhubarb in particular, is a hardy stem, that flourishes in the harsh Icelandic climate, meaning it appears frequently in their cuisine. For this reason I have decided to make my own rhubarb jam in order to make the recipe more challenging.


Level: high
Methods: rubbing-in, jam making
Skills: stewing, baking

Time: 2 hours (reduced to an hour if you use shop bought jam)
Makes: 8-10 slices


Ingredients

For the jam:
500g rhubarb, weighed after trimming, cut into 3cm chunks
500g jam sugar
1 vanilla pod, halved lengthways
juice 1/2 lemon

For the base and topping:
250g white spelt flour (plain will suffice if it’s all you can find)
200g rolled oats
1/2tsp baking powder
25g caster sugar
100g muscovado sugar
75g butter, diced
1-2tsp vanilla extract
1 egg


Method

1. Put a small plate in the freezer.

2. Put the rhubarb into a large saucepan with the sugar and halved vanilla pod.

3. Heat gently, stirring, until all the sugar has dissolved, then squeeze in the lemon juice and increase the heat.

4. Boil for about 10 mins, skimming off the scum as you go (the fruit should be soft).

5. Test for setting point by spooning a little onto your chilled plate. After 1-2 mins, push your finger through the jam – if the surface wrinkles it is ready, if not, keep cooking for 2-min intervals, testing in between. (Or if you have a sugar thermometer it should reach 105°C)

6. Once the jam is ready, let it cool for about 45 before use. This will make more jam than you need, so you can place the excess in sterilised jars (it will keep for 6 months).

7. Next make the crust. Cut the butter into small cubes.

8. Preheat oven to 200°C. Grease and flour a cake tin.

This recipe can be made in a 8-inch cake tin, a pie dish or a small tray bake pan. You can also reduce the amount of jam used to produce a portable snack bar.

9. In a large mixing bowl, combine the flour, oats, baking powder, and sugars.

10. Add the cubed butter. Then combine the ingredients using your fingertips, rubbing together until the mix resembles sandy breadcrumbs.

11. Add the egg and vanilla extract, then stir to make a loose dough. Bring together with your hands and then knead for about a minute or until the dough is cohesive and malleable.

12. Place 2/3 of the dough into the base of your chosen cooking tin. Press firmly into the tin and push up the sides to create a 1cm high crust.

13. Cover your dough with the rhubarb jam.

14. Crumble the remaining dough on top of the other layers.

15. Bake for 25-30 minutes, or until the the crust is golden and the jam is beginning to darken at the edges. Do not allow the jam to burn.

16. Allow to cool fully before serving.

Kjötsúpa (Icelandic Lamb Soup)

image

Whilst in Iceland I ate a variety of challenging foods (more on which later) but one of my favourite meals was undoubtedly a simple soup named kjötsúpa. This lamb broth has been a winter staple in Iceland forever, owing to the availability of the ingredients and the popularity of sheep, which were brought by early Viking settlers to Iceland nearly a millenia ago.

One of the most unassuming meals I have enjoyed this far, I didn’t even remember to photograph so had to acquire this photo later. The soup itself is warmly accented with winter herbs and black pepper, overflowing with yielding sweet alliums and root vegetables. The hearty chunks of lamb are meltingly tender and the broth is speckled on top with tiny rivulets of fat from the rich meat (or the soup has eyes if you are Dutch!)

This hearty meal is indeed humble, but is surely an example of the whole being greater than the sum of its humble parts. Famous Icelandic food writer Nanna, tells how the soup is widely regarded as a cure-all for winter colds and ailments, as well as providing respite from the short-day depression suffered by many natives (Iceland only receives four hours of sunlight during midwinter.) Whilst I can’t speak for its medicinal qualities, this soup is truly comforting and delicious.


Level: low
Skills: boiling, simmering

Time: 1 hour 45 min
Makes: around 4 bowls (depending on the size of your bowl and your appetite)


Ingredients
400g lamb shoulder (preferably with some bone)
750ml water, plus more if necessary
1tsp sea salt
½tsp freshly ground black pepper
1 onion, chopped
1 leek, chopped
1tsp each of dried parsley and thyme
1 bay leaf
200g turnip or swede, peeled and chopped
100g carrots, peeled and chopped
100g potatoes, peeled and chopped
50g chopped green cabbage


Method

1. Trim some of the excess fat off the meat, and cut into chunks.

2. Place it in a large pot, add the water and bring slowly to a rolling boil.

3. Skim the broth, then add salt, pepper, onion, leeks and dried herbs. Reduce the heat to medium low and simmer, partly covered, for about 45 minutes.

4. Meanwhile, prepare the vegetables. They should be chunky, large enough that each piece is a separate spoonful. Add the turnip, carrots and potatoes to the soup, and continue simmering for 15 minutes more.

5. Next, add the cabbage and simmer for 5 to 10 minutes, or until all the vegetables are tender.

6. Lift the meat out from the soup, and separate out the bones, sinew and excess fat.

7. Chop the meat up into bite-sized pieces and add them back into the soup. If needed, add a cup or two of more water, and adjust seasonings.

The soup is best enjoyed the day after it is cooked, so you can leave this in the fridge overnight, if you can resist the aroma.

Astarpungar (Icelandic Love Ball Doughnuts)

image

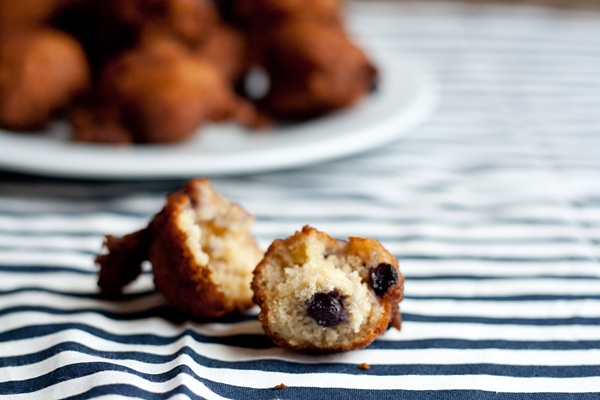
Raisin-studded Astarpungar

It has long been my theory that all the world’s cuisines share a great many methods and techniques that have resulted in similar products popping up all over the world. Astarpungar are the Icelandic equivalent of Doughnuts (or Gulab Jamun or Beignet or Churros or Caribbean dumplings). Whilst their older cousin, the Kleina, is more abundantly available in Icelandic cafes and supermarkets, it is this raisin studded variant, that I found more enjoyable and a darn sight easier to make.

These fried balls of sweetened dough are soft and fragrantly sweet beneath their golden crust. The best Astarpungar I tried in Iceland were delicately flavoured with cardamon, lemon and a hint of vanilla. Traditional recipes only really suggest the addition of the cardamon, but I believe a combination of the three gives a more complex flavour profile that is ultimately more satisfying to eat (apologies to the purists!)

Love Balls are leavened with baking powder as opposed to yeast, meaning there is no real need for proving. In fact the majority I tasted were fairly dense inside, so I am only resting the dough/batter for a short time.


Level: medium
Methods: enriched dough/batter
Skills: deep-frying

Time: 45 min
Makes: around 24 Love Balls


Ingredients
2 eggs
75g caster sugar
1/2tsp vanilla extract
1tsp lemon zest
220g plain flour
3tsp baking powder
1/2tsp salt
1/2tsp cardamom
190ml whole milk
50g raisins (soaked in warm water to plump up)


Method

1. Whisk the eggs, sugar, vanilla and lemon zest in a measuring jug. A fork will do for this job.

2. Sift the flour, baking powder, cardamom and salt together into a large mixing bowl.

3. Gradually add the egg mixture to the dry ingredients, stirring all the time. The mix will still be quite dry at this point.

4. Next, carefully add the milk, to make a thick batter-like dough that can almost hold its shape. You are unlikely to need all of the milk, so work slowly.

5. Fold in the plump, softened raisins. Rest the dough for ten minutes whilst preparing to fry.

6. Preheat a deep fat fryer to 180°C.

7. Use two spoons to shape the dough into crude balls shapes. You may use your hands to perfect the shapes, but use plenty of flour as the dough is sticky.

8. Fry the balls in batches of 6 for 3-4 min, or until they are a delicate golden brown and well puffed. Make sure you turn the balls several times during frying to cook evenly.
Tip: it is advisable to cut open your first Astarpungar, to check it is cooked through. If not, decrease the temperature to 170°C and cook for longer. Undercooked dough is unpleasant to eat and can cause an upset stomach.

9. Remove the balls with a slotted spoon and drain on absorbent kitchen paper.

10. Repeat until all of the dough is used up.